My Blog List

  • CLIMATE CRISIS REPORT - *We now have the clearest picture yet of how different the world is today as a result of human-driven climate change. The most comprehensive report to da...
    2 years ago
  • - *Hello Nee my old friend,* *It's been two years now since I last heard from you. I hope you are well and very happy. I know I became a burden to you wit...
    2 years ago
  • - *YOU are gone from my sight but never from my heart. Rather than mourn your absence, I will be grateful for the friendship that we shared for more than ...
    4 years ago
  • - [image: Image result for animated merry christmas images]
    4 years ago
  • Creamy Dill & Salmon - *Prep/Total Time: 30 min. Makes: 6 servings* *1 salmon fillet (about 2 pounds)* *2 teaspoons lemon-pepper seasoning* *1 teaspoon onion salt* *1 ...
    6 years ago

Saturday, March 31, 2012

Chuckles


Felt Carnations

Make a pretty carnation felt button to embellish a bag or a piece of clothing. This felt craft is easy and versatile for almost any project. Add a felt flower to your next project. Looks great on your favorite summer purse.
Carnation Felt Button


Materials:
  • Needle
  • Thread (to match felt color)
  • Felt Glue
  • Scissors
  • 19 x 12 Pirate Soft Felt Sheet
  • 1 9 x 12 Soft Felt Sheet- Any Color
  • 12 1/4" Fun Button
Optional:
  • Pinking Shears
Instructions:
 Cut the following pieces from felt: Pirate Soft Felt:
3 Leaves
Optional: use your pinking shears on the edge of the leaves

Soft Felt Sheet (any color): 6 Large Circles...4 inches in diameter
1 Small Circle ... 2 inches "      "

  1. Sew a gathering stitching a circle pattern in the center of each large circle about 1/3 up from the center. Pull the thread tight and knot off the end of the thread.

    Step 2
  2. Sew the 6 gathered flowers together from the bottom of the petals. Pull the thread tight to gather the petals in a very tight circle. Knot off the thread.
  3. Glue the three leaves to the bottom of the petals in an off center manner. Let dry.
  4. Glue the small circle to the bottom of the petals and leaves. Let dry.
  5. Glue finished flower to the front of the Fun Button. Let dry.

Thursday, March 29, 2012

Ask Maxy

Dear Maxy ,
Almost everyone uses profanity and derogatory words on my job . It is extremely sickening and I don't know what to do about it . Should I tell my colleages to toned it down ?
Annoyed
Dear Annoyed ,
I worked with a company for some time where almost all of the employees cursed loudly at different points during the day . Once I had to cut short call because of the volume of the voices around me , couple with my colleagues' foul language .
After I got off the phone , I interrupted the folks who were talking and asked if in the future they will tone it down . I explained that it was impossible for me to conduct professional business with all their expletives and loud voices peppering the background . They heard me and attempted to be quieter .
Can you get your folks to clean up their vocabularies completely ? Probably not . But by calling them on it , you can likely get them to hush up .
Maxy

Dear Maxy ,When I married the man of my dreams , I gained a teenage stepson who loves with us . My husband refused to communicate with his ex , so she would just show up to see her son . She lives in another country , so I thought I would befriend her and offer to let her stay with us when she visited .

My husband and I are working through some financial hardships right now . during his divorce , my ex gave his ex the business he created . She pays no child support . Now I see she visits Miami all the time , staying in luxury hotels , yet she won't spend a dime for her son's benefit .

I have to admit , I'm jealous and a bit annoyed that she has no financial obligation to her son , but expects him to bend over backwards whenever she calls or visits . Should I push the child support issue or just let it go since she isn't a frequent part of our lives ?

Stepmom

Dear Stepmom ,

How does your husband feel about it ? How would your stepson feel if your attempt to get child support caused his mother to stay away ? Consider all the repcussions , discuss it with your husband , and then let the final decision be his .

Maxy

Dear Maxy ,

My ex- boyfriend is getting married , and he sent me an invitation. I don't quite know what to think . We broke up only a year ago , after being together for a long time . I know he invited a number of our shared friends , so maybe that's why he invited me , but I don't feel comfortable going to his wedding .

I still have feeling for him ... both love and disappointment . I don't think I could stomach watching him walk down the aisle with someone else . What can I say to him ? I thought this door was closed , but he has reopened it in an odd way .

Weirded Out

Dear Weirded Out ,

You do not have to go . In fact , I do not recommend it . The people who should be attending weddings are those who love and support the couple ... both people ... as they are joined together in matrimony . Old flames and others should not be on the guest list . I need to quality that by saying that old UNRESOLVED flames should not be on the list .

Some exes genuinely are neutralized to friend status and are supportive of the new union . Not so in your case . All you need to do is send back the RSVP card expressing your regrets . Next , do your best not to ask for blow-to-blow from friends that attended . Instead , stay disconnected .

Maxy

Tuesday, March 27, 2012

Create a Work of Art and Re-cycle Plastic Bottles

3-D Canvas with Silk Flowers
Give a floral canvas painting real dimension with stiffened silk flowers and a 3-D vase made from a plastic water bottle. This great project from Heidi Borchers of Inspired at Home is a great way to recycle a plastic water bottle instead of tossing.

Materials:
  • Canvas – 12” x 24”
  • Texture paste (Aleene’s True Snow works great for this) – 2 jars
  • Palette knife
  • Texture comb (You can buy these at home improvement stores in paint department or you can make your own from mat-type cardboard – see Heidi’s Designer tip to make your own texture tool.)
  • Silk flowers and leaves (I purchased mine from a dollar store. Remove flowers from stems. Cut stems to fit into arrangement.)
  • Aleene’s® Fabric Stiffener
  • Brush – ½” flat
  • Plastic water bottle – Cut in half for vase
  • Paints: Black (paint entire dried background, flowers & plastic bottle vase)
  • Background – Upper: Dark Blue (Navy), Med Blue (Denim) Lt. Blue (Sky)
  • Lower: Yellow, Red, Orange and Dark Green (Pine), Lt. Green (Wedgewood)
  • Flowers: Burgundy, Red, Orange, Yellow
  • Leaves and stems: Dark green (Pine), Med. Green (Leaf), Brown (Chocolate)
  • Vase: Beige (Butter Cream, Lt. Green (Wedgewood)
  • Wax paper
  • Plastic zip lock bag
  • Instructions:
  1. Using the palette knife, apply and spread an even thickness of the texture paste onto the canvas background and the sides of the canvas. To create the texture on the background, pull the texture comb through the texture paste while it is still wet. Create the texture on the bottom 5” of the canvas in a different direction. Place a small amount of texture paste onto the half of plastic water bottle. Place this into the wet prepared background of the canvas. Using photo as a placement for this process.
  2. Put wax paper onto your workspace. Place the silk flowers and leaves into the plastic zip lock bag. Pour some of the Fabric Stiffener into the bag over the flowers and leaves. Close the bag tightly. Work the fabric stiffener into the silk flowers. Make sure you get all the flowers covered. Carefully pull out one flower at a time, and arrange flower onto the wax paper. Arrange the petals, and the leaves, the way you want them to dry, then carefully place onto the prepared background. Repeat with all flowers and leaves. Place the stems into the background. Let Fabric Stiffener and texture paste dry completely.
  3. Using a brush, paint the entire prepared background, vase, flowers, and leaves with black paint. Let paint dry.
  4. To paint the colors onto the entire art piece, you will be layering the paint colors. Each layer of color should be almost dry before applying the next color: For the upper background, first brush on the navy blue over the upper background area. Second, brush on the medium blue paint. Then the light blue paint. The upper background also has a few brush strokes of medium green as a final touch. For the lower background/Checkerboard: Yellow area, first paint yellow, then orange, then small dry brush strokes of Red. For the Green area, first paint dark green, then light green. For the Vase: Paint the beige, then dry brush strokes of the light green. For the Flowers: Paint the burgundy first, then the red. Paint the orange at the center area of the flower and the tips of the flower. For the flower center, paint yellow, then orange. For leaves and stems, paint dark green. Dry brush with the medium green and the light green. Dry brush the edges of the leaves with the brown paint.
Heidi’s Designer Tip: To make your own texture comb, cut a piece of heavy mat board approximately 2” x 4”. Using pinking shears, cut along one edge of the 4” side. Clean the cardboard off each time you pull through the texture medium.

Monday, March 26, 2012

Kids Say The Darndest Things "Just Plain Fun"


A teacher one day decided she wanted to see what was on her small students mind and why , their answers are surprising , and their reasoning even more so .
*** "Are you having a good time today ?"
"Oh , Yes sir ,"replied a seven year old joyfully . "This is lots of fun ."
*** "What do you like about TV City ; the cameras , the stages and the lights."
"I like the blonde at the front desk ."
*** An older child with experience of the pitfalls (8-years-old) educational careers announced .
"If I could invent anything . I'd make some glasses with open eyeballs painted on them so you could sit in c lass and sleep and the teacher would think you were listening .
"*** An even craftier lad had a devious reason for wishing to be a snake. He explained .
"because if you poison people and you're a person they put in jail . But they couldn't put you in there if you're a snake because there aren't any snakes in jail ."
*****************************************************************
Pre-schooler's are completely delightful in their artless response to "if you could be questions" , here is a few that no grown-up could ever invent .
*** "I'd like to be a fish 'cause I like to wag my tail when I take a bath ."
*** " I'd like to be six . I'm tired of being five . I've been five for a whole year ."
*** "I'd like to be growed up . I want to see what it's like ."
*** "I'd like to play army , but I'm getting tired of it . I'm alwways the enemy ."
*** " I'd like to be forty-five so I could watch TV until thirty o'clock at night .
******************************************************************
If all else fails , here is the question that open the conversational floodgates of kids .
Little boy that's almost a successful invention .
*** I'm building a funny machine in my back yard so I can play jokes on people."
"How does it work?"
*** There's a wire that traps them and they fall down and are carried down a big moving belt that finally drops them into a black-hole where I take all their money."Another little dreamer had another fantastic pastime .
*** I like to jump on my pogo stick and bounce up to heaven ."
"What do you see up there ?"
*** Girl angels , dog angels , cat angels and fish angels ."
"No boy angels ?"
*** "No , boy angels or worm angels don't go to heaven .
*********************************************************************
Let's look over a few choice comments by children on the subjest of 'age.'
What age would you like to be instead of six?
*** Seventeen , 'cause then you're an old women and pretty soon you're be with God .
You're five , How old would you like to be ?
*** Fourteen.
Why ?
*** So I can be a father . (He paused to consider) I'd like to start with fifty-one children .
How old are you ?
*** Six and three quarters and a half .
How old would you like to be ?
*** The oldest man in the world .
What gave you that idea ?
*** Because then my name would be in the Bible and if I'd been good I'd be the highest in Heaven , and if I been bad I'd be the lowest on earth .
What's the best part of being ten ?
*** My allowance is bigger .
How much do you get ?
*** Fifty cents .
How much did you get before ?
*** Seventy-five cents .
Whoa ! Uou're going the wrong way aren't you ? Isn't that smaller ?
*** My sister got married last January and my folks are still broke .

Saturday, March 24, 2012

DENIM ORGANIZER and More


 This fun organizer uses the legs of cut-off jeans and is a great project for summer teen sewing classes. The finished hem of the jeans creates the top of the pockets so that there is no need to bind the edge.

This project can be embellished in many ways. We used machine embroidery and decorative stitches. Other options include hand embroidery, rick rack or other trims or appliqué. It could also be personalized and the pockets labeled.

Denim Organizer

SUPPLIES

  • Jeans Legs: 3 pair of “legs”
  • Denim fabric: 1 yard
  • Cord for hanging: 1 yard
  • Dowel: 24"
  • Coats Dual Duty Plus® Extra Strong Jeans Thread (N574) or
  • Coats Dual Duty Plus® All-purpose Thread (Art 200): color 5 Copenhagen or to match denim.
  • Coats Rayon Thread–30 wt. (Art D93): color 182 Spark Gold and Coats Rayon Thread–40 wt. (Art. D63): color 51 Chona Brown were used in this project.
  • Stabilizer for embroidery
Project Instruction:
Organizer fabric: Cut 2 pieces of fabric 22" x 25".
Pockets: Cut the pants leg sections apart at the outer seam, trimming away the seam. 1st Row: Trim 3 leg pieces 5" high by 10" wide. 2nd row: Trim 3 leg pieces
9 1/2" high by 10" wide.


Decorate pockets as desired with decorative stitching, appliqué, machine or hand embroidery, or trims.

To form each pocket row, sew the three same size leg sections togetherdenim-illustrations
    Mark the pockets as shown for folding pleats (1). Fold solid line to dotted line. At seams, fold solid lines to seam line, do not overlap. Baste pleats in place at lower edge.
Attaching top row: Mark a line on organizer fabric 11 1/2" from top edge. Place pocket row on fabric, right sides together, with the lower raw edge of pockets against the line (2). Stitch, 1/2 inch from edge. Press seam allowance toward pocket.

Bring pocket section right side up, press. Baste side seams. Stitch in the ditch using Jeans thread or all-purpose at seams in pocket row to form individual pockets (2).
Bottom row: Fold pleats and baste.
 Place pocket section on organizer fabric, right side facing you, aligning raw edges.
 Baste sides and bottom edge of pocket.

Stitch in the ditch at seams in pocket row seams to form individual pockets.

Place backing fabric over organizer, right sides together. Stitch together, using a 1/2" seam allowance. Leave a 1" opening in the side seams at the top corners for inserting a dowel or curtain rod and a 6" opening in the lower edge for turning.

Trim corners diagonally. Grade lower edge to reduce bulk. Press the seams open before turning. Pay particular attention to places that are thick due to jeans seams. Turn to right side. Press. Hand sew opening in lower edge closed
Insert dowel, attach a cord for hanging. For better stability use a curtain rod and brackets for hanging

Other Ways to Recycle Denim
Denim Pocket Purses or Denim Pocket Fridge Magnets
Re-use the pockets from old blue jeans to make Denim Pocket Purses or Denim Pocket Fridge (or Locker) Magnets - both are sure to be bestsellers at your next church bazaar sale!


Denim Lace-Trimmed Shorts
A new twist to cut-off shorts...simply cut down old jeans to shorts length and add lace to the new hem. Also consider adding lace to the top of the pockets, either with fabric glue or hand sewing. Instant flair and style for almost no cost!


Denim Capri Pants
Are your jeans too short to wear bare foot, or with your favorite shoes? Take advantage and shorten them some more...cut off at 3/4 length and make a pair of capri pants with a plain hem, or trimmed with lace at the bottom.

Denim Placemats
Use old jeans to make unique placemats...incorporate the pockets as part of the placemat to hold silverware in place.

Denim Pot Holders
Denim will stand up to the rigors of pot holder duty and look great in the kitchen. Line with fleece, quilt batting or even squares cut from old sweat shirts. Incorporate the pocket if you want to get fancy, or take advantage of those gold-thread seams.

Denim Wine Bags
Use the legs from blue jeans to make two wine bags...sew the bottom closed, and hem the top leaving an opening on one side, or both sides, to thread through a golden cord drawstring. Leave plain or embellish with lace, buttons, ribbon, or small silk flowers. Tres chic!

Denim Pencil Case:
Are you tired of your kids' pencil cases falling apart? Take advantage of the strength of denim and make a rectangular zippered bag large enough to store all the kid's pens and pencils.

Chuckles


Posted by Picasa

Thursday, March 22, 2012

Ask Maxy


Dear Maxy ,
Do you think it's wrong to meddle in a friend's potential divorce ? Last week I recieved a phone call from my friend , saying he is no longer happy in his relationshil and wants to divorce his wife . After he finished discussing his problems , my friend asked me to walk him through the process of divorce . I told my friend that I was uncomfortable and would not help him with the process to break up the marriage . Do you think I did the right thing in saying no ?
Concerned Friend
Dear Concerned Friend ,
It's one thing to actually help someone get divorced and another to talk about your own experience . Since you went down this path already , why don't you just tell your story ? You can explain how the divorce came to be ... including the messy details , emotional drama and any other discomforts or regrets you may have with your ex now and whether it works for you .
You can also tell your friend that you choose to remain neutral about your choice . Explain that you know how uncomfortable and challenging divorce can be and that you don't want to be in the middle of his marriage or divorce , should that happen . Tell him that you care about him and support him , but that you intend to stay out of the details of his business .
The one thing you can do before stepping down away from the divoce story is to give him your divorce lawyers contact information . If you thought the lawyer was good .
Maxy
Dear Maxy ,
I am so annoyed by social media , I find that people now seem to be able to reach into my computer and talk to me , no matter what I;m doing . While sitting at work on my laptop , I get invitations to talk via Skype , popups and Facebook and invitations from other sites I don't even know . I don't want to be rude to people , but enough already . I don't want to be connected at ever moment . I value these tools as well , so I don't want to throw them away . But honestly , this over the top . How can I manage what feels like an invasion in my life ?
Besieged
Dear Besieged ,
I know what you mean . I apprecite social media , but , yes , it can be a double edge sword .
It's not rude to ignore these interruptions if you are busy . You can even post messages telling people not to contact you doing work hours . You can block invites from people who don't get the message .
Look into each of your social media entities to see what kinds of controls you can put on interaction . It may take a bit longer to navigate after you add the controls , but it surely can be worth your peace of mind .
Maxy
Dear Maxy,
Last week , my sister surprised me by showing up unannounced with her two dogs .She said she planned to stay for a week .
I do not have dogs , and that is my choice . My sister dogs are kept in a truck while she travels , and I feel sorry for them . But I don't want them in my house .
Please tell people not to bring their beloved animals to other people homes . People who prefer not to have dogs , they do not find them as cute as they do . I don't care how well mannered they are , they still shed , need attention and occasionally dig a hole in the yard .
Annoyed in Yuma
Dear Annoyed in Yuma ,
No one , relatives included , should drop by unannounced and expect to be put up for days on end . And bring there animals with them is terribly inconsiderate unless they have been specifically invited . We know how much people love their dogs and cats ( and birds and pet snakes) , but asking others to be responsible for housing them is inapportriate and makes the entire unwelcome . Please people , be the type of guest who is enthusiastically invited back .
Maxy

Monday, March 19, 2012

Kids Say The Darndest Things 'Brethern and Sistern'

The excitement attendant on the arrival of a new member of the family that is a prime topic that elicits some very astonishing answers .
****************************************************************************************
*** One youngster said ... "My mother's sick and tired of waiting for the baby to get here .
*** When is it actually expected ?
Any time now . Mother been waiting for almost a month."
*****************************************************************************************
***Then there was the rather confused young man who was only four-years-old.
himself .
"We have a new baby about a week old ."
*** "Is it a boy or girl?"
"So far , I think it is a boy ."
*** "SO far ," the man echoed , "what does it look like ?"
"A girl."
******************************************************************************************
*** The teacher said I heard something exciting is about to happen at your House ."
"Oh, you mean about the boxer dog ?"
*** "No . I understand it's about your mother ."
"Oh , that's nothing . She's just going to have another baby."
*** That sounds exciting to me . Do you want a sister ?"
"It had better be a sister ."
*** What do you mean better be ?" The teacher was surprised at the belligerent tone .
"My daddy says if it's a boy he's going to drown himself ."
*** "Do you believe him , now really?"
"No . He says this every time and then laughs . He says he might be drowning the wrong man .
*** Another little "Pitcher" had ears big enough to catch this bit of by-play :
"We have five kids in the family . But there's never going to be another one ."
*** "How can you be so sure ."
"Because Daddy says every sixth baby in the world is Chinese , and we don't want one ."
**********************************************************************************
*** Mother's little helpers learn early in the game some of the hazards inv olved in bringing up a family .
"WE have a five month old baby in our family."
*** The teacher said I hope you help your mother ."
"Oh , I wash the baby , change her pants , rock her to sleep , vacuum , make the beds , wash her clothes and feed the Pablum."
*** "Then what do your mother do ?"
"She plays gin rummy ."
*** "What is the worst job of the lot ?"
"Feeding pablum."
*** "Why ?"
"She sneezes ." My job is to put on the diapers . There are only three main troubles . The old oles stink . The new ones fall off . And the damn baby wiggles."
***********************************************************************************
*** The teacher said someone been talking about having a baby at your house .
"It's Me !"
*** "You're going to have a baby ? How old are you ?
"Almost six ."
*** "When are you going to have this baby ?"
"Almost six ."
*** "Why wait so long ?" teases the teacher .
"Gee , I've got to find a husband first ."
*********************************************************************************
*** Any brothers or sisters ?
A six year-old-sister .
*** *** What does she do most of the time ?
Pick fleas off the cat .
*** What kind of cat?
Well , we had it in the male cage but it turned out to be a female .
*** How did you find out ?
He had three babies and he's going to have some more .
*** Who told you ?
Nobody , but I feel then licking and scratching inside her tummy .
*********************************************************************************
***The teacher said there is something exciting going to happen at your house pretty soon .
"I'm expecting a baby ."
*** Well , isn't there someone else envolved besides you ?"
"My mother is ."
*** Well , that's good . I'm glad you are giving her a little bow !"
"And the angels are going to bring it."
*** "And the angels are going to bring the baby ... well , how soon are you expecting it ?"
"Two weeks ."
*** "In two weeks ! Gee , that's exciting . Do you have any brothers and sisters ?
"Yeah , one boy and his name's David ."
*** How old is he ?
"Two months."
*** "What !'
"Well , my daddy said the angels speeded up their delivery this year ... they are on a new schedule .

Saturday, March 17, 2012

Kate Middleton : Give Shamrocks To Irish Guards On St. Patrick's Day


Kate Middleton understook her first solo military engagement on St. Patrick's Day , participating in the military parade in Aldershot , England .
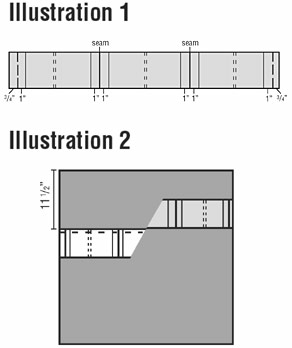
Sporting an emerald-green dress and a gold broach , the Duchess of Cambridge handed out shamrocks to 40 members of the 1st Battalion Irish Guards .
She also pinned one on the collar of regiment's mascot C ormeal .
Middleton got right into the spirit of the festivities , sipping sherry along side the Irishmen .
Last year , Prince William was made honorary colonel of the regiment .
Just a thought : Such a gorgeous woman , inside and out . A great role model of elegance , class and true beauty , a lot of young women can learn from her . She always holds herself with poise and confidence and is a fantastic role model for anyone .

Friday, March 16, 2012

The Queen and Prince Philip...Then and Now


In honor of Her Majesty's Diamond Jubilee
The sixtieth anniversary of her ascension to the throne

Note: she is wearing the same pearls and brooch in both pictures.

Thursday, March 15, 2012

Ask Maxy


Dear Maxy,
My daughter-in-law says if food os on the floor for three seconds or less , it is OK for her four-year-old son to eat it .
At my house , I insist that he wash his hands before eating , and when I can , I clean his fingernails with a small brush and soap because his nails are always filthy . At his own home , however , he never washes his hands before meals . Should I say something ?
Concerned Grandma
Dear Grandma ,
Unless your grandson is frequently sick , say nothing . A lot of people follow the "three-second rule" about dropped food . It's not the healthiest thing to do , but we assume the floor is cleaned regularly and the food isn't covered in grime (or worse). Continue to teach your grandson appropriate hygiene in your home , and suggest to your son that he do the same . Beyond that, let it go .
Maxy
Dear Maxy ,
My assistant is very sweet and earnest in her efforts , but she has one significant shortcoming : She has no clue what is apporpriate to wear to business functions . She has attended several functions with me or on my behalf recently , and she has been an embarrassment . What I mean by this is that she is either been way to casual , even wearing sneakers to an after-five cocktail function , or she has gone overboard and worn something way too sexy that should be reserved for a date . I tried to give her a little advice on what to wear the last time , but it didn't get through.
How can I help her ? I won't be able to invite her anymore if she doesn't dress more apppriately . She could have a promising career .
Fashion-Conscious Boss
Dear Fashion-Conscious Boss,
I bet your assistant truly doesn't have a sense of what appopriate professional attire is .She needs a real education . Tell your assistance that it is essential she learn how to dress appopriately for the functions in which your company participates , or she will no longer be invited to attend . Assure her that you will help her learn what's appopriate.
You can go online to websites that present fashion . Type in "professional dress for women" and many ideas will pop up .
If your assistant balks at dressing more appopriately , make it clear that her workplace has wardrobe standards . Tell her that you want her to win at your company , so you recommend that she find her style within the cmpany's boundaries .
Maxy
Dear Maxy,
I am in a quandary , I asked my brother and his wife to buy a raffle ticket to benefit my grandchildren's youth athletic boosters . They agreed and promised to get the money to me the week before the drawing .
By the night of the drawing , they still had not paid for the ticket , so I paid for it myself . This ticket actually won the raffle . I asked the people in charge what to do , and they said the ticket was mine at the time of the drawing , so the winnings belong to me .
My brother showed up a week later with a check dated the night of the drawing . I told him the raffle was over , but he would not take his check back . I didn't tell him the ticket won . What should I do ?
Want To Do The Right Thing
Dear Want ,
Technically , the ticket belonged to you at the time of the drawing . However , it is obviously still a source of anxiety , so I suggest a compromise . You purchased this ticket for your brother and was holding it for him . He provided a check in good faith , albeit late . Unless there are legal repercussions , I think you should give him the winning or at least offer to split them .
You'll feel better .
Maxy

Wednesday, March 14, 2012

Pompom Easter Bunny Basket


by Twila Lenoir

This little pompom bunny in his cheerful little Easter basket is  made from pompoms of various sizes. With this version, there's no need to make the bunny body as all you can see is a bunny face peeking out of the Easter grass.

Pompom Bunny Basket
Supplies:

1 large (2 inch) white pompom
2 small tan or grey pompoms
1 tiny red pompom
1 tiny pink pompom
small scraps of white and pink felt, craft fun foam, or even construction paper
small Easter basket
tacky glue
easter grass (or a small tuft from a Christmas evergreen to use as grass)
narrow ribbon
optional - two tiny, fake carrots, little easter eggs or similar ornaments

Pompom Easter Bunny Basket
Instructions:


1. Cut two identical spoon shaped pieces of white felt, about one inch long, for the bunny ears. Cut two smaller spoon shaped pieces in pink felt. Glue the pink ear piece to the larger white piece at the bottom of both pieces, pinching the sides together until the glue holds, so that the ears curve inwards a little bit. Set aside.

2. On the 2 inch pom pom, which is the bunny's head, glue the two tan or grey pompoms, placing them together for the cheeks.

4. Glue the tiny pink pompom on top of the two tan pompoms, then add a tiny red pompom for the tongue.

5. Glue the eyes in place above the nose.

6. Glue the two ears on top of the 2 inch pompom.

7. Prepare the basket by gluing easter grass inside it, so the grass appears above the basket rim, as shown.

8. Separate an area of the grass where you want the bunny to go, apply glue to the bottom of the bunny and press gently into place.

9. Add the two small carrots or other embellishments.

10. Finally, glue a narrow length of ribbon around the rim of the basket and over the handle. Finish with a small bow or two made of the same ribbon.

Pompom Bunny Hangup

Pompom Easter Bunny!
by Twila Lenoir

Hang in There Bunny


Supplies:
2-2 inch white pompoms
2- small tan or grey pompoms
1-medium white pompom
1-tiny red pompom
9- tiny pink pompoms
1- white bumpy chenille ste1- pink plain chenille stem
7mm goggle eyes
Scrap piece of white felt
small grapevine wreath

Instructions:
1. You may have to enlarge the pattern for the bunny's feet and hands. Print and cut out the pattern pieces, then trace them onto white felt. Cut out two feet and two hands.

2. Cut the bumpy chenille stem so that there are two bumps on the stem. Fold the stem in half so that the two bumps are together and the folded part of the stem is at the top. Cut a piece of the pink chenille stem, about the length of the bumpy stem. Glue in the center of the two bumpy stem ears. Make another to complete the two ears.

3. On the 2 inch pompom, which is the bunny's head, glue the two tan or grey pompoms, placing them together for the cheeks. You can also use white, but I thought that it would be hard to see.

4. Glue the tiny pink pompom on top of the two tan pompoms, then add a tiny red pompom for the tongue.

5. Glue the eyes in place above the nose.

6. Glue the two ears on top of the 2 inch pompom and now glue the head to the bottom inside area of the wreath. You will also need to glue the ears to the wreath because the bunny's head is a little top heavy.

7. Glue the other 2 inch pompom on the bottom of the wreath. Glue the medium white pompom to the back of the bottom 2 inch pompom for his tail.

8. Now glue the two hands on the wreath next to the head and the body. 9. Glue the tiny pink pompoms onto the felt feet, three for the toes and one for the heel. Do the same for the other foot and glue them to the body, as shown in the picture.

9. It's hard to see in the picture, but I made a thin ribbon bow and attached it to the top of the wreath with a loop for hanging.

Chic Chick Basket Craft

Supplies:
  • Basket
  • Assorted sizes of styrofoam eggs
  • Styrofoam block
  • Toothpicks or small dowels
  • Two to three shades of acrylic craft paint (yellow, yellow orange, and orange)
  • Brown craft paint for spatters
  • Paper towels
  • Black and white craft paint for dot eyes
  • Extender
  • Sponge brush
  • Fine liner brush or fine point marker
  • Toothbrush for spatters
  • Florist oasis
  • Green yarn
  • Ribbon
  • HERSHEY'S MINIATURES Chocolate Bars
Instructions:
  • To create the egg chicks, push a toothpick or a small dowel into the bottom of each egg and place the other end of the toothpick into a styrofoam block - this will make it easier to hold the egg upright for painting and drying.
  • With the sponge brush, paint the eggs assorted colors, we used yellow and yellow orange paint, then let them dry. To add some country charm, thin some brown paint with water, then use a toothbrush to lightly spatter the paint onto the eggs. Make sure to practice spattering on a paper towel before you attempt to add color to the eggs.
  • Next you're ready to add some personality to your chicks. To create the beak, use the orange paint and make a small diamond shape. Thin some black paint with water or Extender, and then use a liner brush to apply eyes, wings, and a smile. Make sure to dot the eyes with white paint on the end of a toothpick to add a highlight.
  • Once your eggs are completely dry, it's time to assemble the basket. Place a square of oasis (from a florist shop) in the bottom of the basket and then cover it with green yarn. Add the chicks by sticking the end of the toothpicks into the oasis. Tie a ribbon to the basket handle.
  • For a special touch, wrap HERSHEY'S MINIATURES Chocolate Bars with ribbon and then attach the candy to the oasis using a long glass-head pin.
  • WARNING: Don't include the pins if you intend to give the basket to small children.
  • NOTE: To change the color of a brown basket, you can create a white glaze and brush it on. To make the glaze, water down white acrylic craft paint with Extender. Use a large brush to apply the glaze and then let it dry.
  • Completed craft is for decorative purposes only

Funny Bunnies for Easter

2ladus

 Choose your fabric,cut out the pieces
easter_ladu02

Simple Easter Bunny:
When you want to stitch the face of your bunny on a fabric it’s good to iron some interfacing on the inner side of the fabric:
easter_ladu03
Now make your little bunny a unique face – maybe some cute cheeks, maybe Miffy-like pout. Whatever your like. And you could give your bunny a heart now :-)
easter_bunny04fh11
Before you sew the front and back of your bunny together, you serge the bottom of the bunny – where you will close it later with a blind stitch. And then: pin the front and the back together – of course the outside in. Sew the parts together and cut the parts between the ears and on the neck. Then serge everything:
easter_bunny05fh11
And now the most exciting part comes: Turn your bunny inside out!
easter_bunny06
That’s it! Now you fill your bunny with doll wadding, use a shop stick for the ears and close your new friend with a blind stitch.
This cute bunny is perfect for Easter decoration – but it’s also perfect as a toy for babies. It’s perfect for little hands to grab it. And it gets even more exciting for babies when you put a rattle in the bunny tummy.
 I sewed two ribbons between the ears to tie them to a baby bed. And I filled the bunny tummy with lavender which has a very positive impact on babies. And you can even put a musical box inside this bunny and make it a wonderful and unique musical cuddly toy.
OK, that was really easy. Now try the other version.
Easter Bunny Toy:
Use the same pattern as before for the body and cut the arm and legs pattern as well. If you want a felt face – cut that one too.
Sew the felt face on the bunny – of your machine doesn’t have that special quilt stitch you can as well use a zic zac stitch or whatever you like. Then stitch the cute face just the way you like it. If you don’t want a smiling mouth – the Miffy-like mouth looks also super cute on a felt face.
easter_ladu06
easter_bunny07
Now pin the the arms and legs outside in, sew them together, serge the edges, turn them inside out and will them with doll wadding. Use a shop stick to reach all parts of the arms and legs.
easter_bunny08
easter_bunny09
OK, now it’s getting serious :-)
Some handcrafters pin now already everything together: the front and back of the body together with the arms and the legs. That’s fine but I don’t do it that way.
First I serge the edges where I will close the body later with a blind stitch. Then I mark with a vanishing pen the points where I want my arms and legs.
easter_bunny10
I pin front and back of the body together, insert the first arm and – start sewing. I insert the other arm short before I come to the point which I marked.
easter_bunny11
easter_bunny12
The same with the legs. Then I cut the parts between the ears and on the neck and serge the edges of the bunnie’s body with a zic zac stitch. This fixes the armes and legs additional – so brutal little kids won’t be able to amputate arms or legs from the cute bunny (well, as long as they are not TOO brutal :-) ).
easter_bunny13
Now again the exciting moment: Turning your new friend inside out.
easter_ladu14
Now you are almost finished. You only have to fill your bunny with wadding, close it with a blind stitch – and that’s it!
And when you really love your bunny – you make it some cute accessories – maybe a scarf? Or a felt collar like I did. If it’s a bunny boy, I’m sure he would like to have some nice pants. Or if it’s a bunny girl – what about a cute skirt? Or an apron? I’m sure there are many things that come to your mind :-)
easterladu_small
easterladu02_small
easterladu03_small


A. Materials List:

QUANTITY
LETTER
NAME
SIZE
MATERIAL
1
A
Top
3/4" x 6" x 18 1/4"
Oak
1
B
Top/Face
3/4" x 1 7/16" x 15"
Oak
1
C
Lid
3/4" x 8" x 14 15/16"
Oak
1
D
Bottom/Face
3/4" x 2 3/8" x 15"
Oak
1
E
Bottom
¾” x 11” x 18 ¼”
Oak
2
F
Sides
¾” x 10 ¼” x 10 ½”
Oak
1
G
Back
¼” x 15 ¾” x 11 ¼”
Oak
2
H
Back Nailers
¾” x ¾” x 15”
Oak
1
I
Front/Face Nailer
¾” x 1” x 15”
Oak
1
J
Letters
1/8" x 2 3/8"
Oak
1
K
Knob
Brass
B. Bread Box Cutting Procedures:
  1. Select an oak board 1" x 11 1/2" x 76". All pieces can be cut from this size board.
  2. Use a jointer to joint one edge of the board.
  3. Use a planer to plane board to 3/4" thick.
  4. Use a radial arm saw to cut pieces to appropriate length.
  5. Use a table saw to rip pieces to appropriate widths.
  6. Use a jointer to joint the other edge of each piece.
  7. Use a band saw to cut the angle for each side (F).
  8. Use a belt sander or a disk sander to smooth out the angled edge of each side (F).
  9. To make the dado joints for the back (G), set the table saw blade to cut 3/8" deep. Next set the fence next to the saw blade to cut the inside/back edge of each side (F). Move the fence 1/8" away from the saw blade and repeat the cuts to the sides. This should allow the thickness of the back (G) to fit flush.
  10. Use a portable hand router and a 1/2" Roman -Ogee Bit to route the outer edges of the top (A) and bottom (E).
  11. Use a portable hand router and a 3/4" straight bit to route a 1//8" deep recessed area inside the design of the lid (C) to provide for the lettering.
  12. Place a 2 1/2"" wide board on top of another slightly larger board and plane the top board to 1/8: thick.
  13. Chose a desirable block lettering 2 3/8" high and trace the letters (J) "BREAD" onto the thin board just planed.
  14. Use a scroll saw to cut out the letters.
  15. Adjust the table saw blade to 30 degrees and rip the top and bottom edges of the top/face (B) and the lid (C). Also rip one edge of the front/face nailer (I).
  16. Cut the back (G) to fit properly after the assembly is completed. Also drill six 1/4" equally spaced holes in the back for ventilation.
C. Wooden Bread Box Sanding Procedures:

Rough sand all parts with an orbital sander and 80 grit sandpaper.
  1. Intermediate sand all parts with an orbital sander and 120 grit sandpaper.
  2. Rough and intermediate, sanding should be completed before assembly procedure.
  3. Finish sand all parts with an orbital sander and 220 grit sandpaper after the assembly procedure.
  4. Hand sand the lettering with 220 grit sandpaper prior to gluing them on the lid.
  5. Hand sand all edges, details, with 220 grit sandpaper just prior to the finish procedure.

 D. Bread Box Assembly Procedures:
  1. Place glue on the ends of the back nailers (H), and position them flush with the dado joints and top and bottom edges of each side (F) and nail them into position Nail through the sides using a nail gun and 1 1/2" nails.
  2. Place glue on the beveled edge of the front face nailer (I), and nail it to the top inside portion of the top face (B).
  3. Place glue on the ends of the front/face-front/face nailer assembly. Position the assembly flush with top and front edges of the sides (F) and nail them together.
  4. Place glue on the ends of the bottom face (D) and nail it into position.
  5. Turn the top (A) upside down. Place glue on the top edges of the sides (F) and the nailers. Place into position on the top and secure by nailing through the nailers.
  6. Place glue on the bottom edges of the sides (F), bottom face (D), and the nailer (H). Place the assembly in proper position on the bottom (E) and nail through the under side of the bottom to secure it into position.
  7. Sand the recessed area of the lid (C) until smooth.
  8. Place glue on one side of the letters (J) and place them into position in the recessed area of the lid (C). Use a nail gun and 3/8" brads to secure the letters.
  9. Place the lid (C) into position and use a nail gun and 1 1/2" nails to place one nail into each side (F). These nails should be positioned 3/8" in from the slanted edge of the sides and 2 1/4" from the under side of the top (A). These two nails serve as the hinges for the lid.
  10. Place the back (G) into position in the dado joints of the sides (F) and nail securely with 1/2" nails. NOTE: The back should be attached after the finish procedure is completed.
  11. Drill hole in lid (C), insert machine screw and attach knob (K). NOTE: This should be done after the finish procedure is completed.

E. Bread Box Finish Procedures:
  1. Use plastic wood dough to fill all holes, cracks and imperfections.
  2. Hand sand all edges with 220 grit sandpaper.
  3. If stain is desired, apply with a brush and allow to dry penetrate for 5-10 minutes, then remove with a clean rag.
  4. Allow stain to dry 6 hours and then repeat with a second coat.
  5. Apply a clear finish coat such as Varathane, Polyurethane, etc. using a pure-bristle brush. Allow to dry 12 hours.
  6. Lightly hand sand finish with 220 grit sandpaper.
  7. Apply second coat of clear finish.
  8. If additional coats are desired, be sure to allow the finish to dry properly, then lightly hand sand with 220 grit sandpaper between coats.
  9. Allow final coat to dry 24 hours before using your wood bread box.
  10. If stain is not desired, continue with steps #5-9 after step #2.
Congratulations, your wooden bread box is finished and ready to use!