


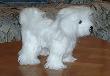
This is a white long haired fluffy plush dog ( a Bichon Frise). You can make him any size but bigger is easier to make. You will also need black button eyes, a small piece of pink satin or felt for lining the ears and black embroidery thread for the nose and mouth. You can also get eyes and noses for stuffed animals at the hobby or craft store in your area. He looks good with a ribbon around his neck or a cat collar from the dollar store.
The Pattern
This fellow comes with a seam allowance. If you print these patterns out at 8x10", you < should come up with a 1" grid, and he'll have a 1/4" seam allowance. That's a bit slim for some fabrics. I've actually put grainline arrows on these pieces, showing the direction the fur should run.


If you're using a fluffy fabric, especially if you have a wider seam allowance, shave it now. Be careful not to shave too far, or you'll have bald spots on the seams. Shave inside the eye darts, too.
Sew the tail pieces together, leaving the base end open. Clip the inside of the curves and turn (a turning tool is useful here). Stuff lightly. Do the same with the ears, but don't stuff them. Sew the eye darts (the marked line is the same line).
Match the side seams on the head, RST, pinning the base of the ear into the seams, and sew. Make sure the ears are symmetrical - they go about where the curve of the head back is sharpest. You may choose to leave them out, and sew them on by hand later.
Match the two head sides, RST, and sew them together. Turn the head rightside-out. If you're using safety eyes/nose, you can put them in now. Or you can embroider the nose and use black buttons for eyes
Match the front legs with the underbody gusset, RST, pin and sew. Match one rear leg - the gusset will only go partway across the top of the leg, so stop 1/4" from the end of the gusset. Match the other rear leg to the underbody+leg, matching the back top corners of the legs and making sure the front top corner is symmetrical with the first leg.
Match the underbody piece with one body side, RST, and pin - begin with the paws, and work out to the front and back ends of the underbody. Sew, then pin the other side, also matching the two body pieces along the dog's back. Pin the tail in the back seam, making sure it's aligned correctly (the tip should point toward the front of the dog). Sew all the way around, leaving a turning opening in the dog's back, and remembering not to sew the neck closed!
You should now have two pieces - the head (right side out) and the body (inside out). Put the head inside the body, matching the neck seam (make sure the dog is facing the right direction - he can face sideways, but backwards is probably a bad idea), and sew all the way around. Turn the body rightside out, stuff, and ladder-stitch the stuffing opening closed.
Trim the fur around the face and paws as desired, embroider a mouth, and you're done!
No comments:
Post a Comment
Through these open doors you are always welcome